Showing posts with label hanging tapestries. Show all posts

9 Aug 2013

More Dryer Felting and Felt Tapestries

Detail from my ultimate project for today's entry


I recently made a small felt wall hanging for one of my sisters on her 50th birthday.  It's had me thinking about felting and making hangings that feature words and symbols instead of pictures.


She's lived a lot since this photo was taken, but hasn't changed so much... I think pictures are forever.
Finished piece measured about 18" x 12"


I love embellishing the felt by needle-felting in handspun yarn and roving.  I attached the photograph on by punching holes around the edges and then needle-felting
 a continuous length of handspun yarn in the holes and into the felt around the edges to look like big stitches.


The symbols I copied out of books of Viking wooden carvings.  I like not only that these are old motifs, but I love the flow of intertwining knots.  Someday I'll do a huge piece with knots all around the border.


I particularly love this symbol, which is 
St. John's cross and represents
happiness (well I guess it wasn't 
St. John's cross to the Vikings! But 
they used it in their art work all the same.)


So after my recent experiment felting in the dryer with Pellon I got to thinking. Since the Pellon disappeared immediately once it got wet, why bother with the Pellon at all?  Why not just unroll a batt, wet it, and throw it in the dryer?  Batts can be so marvellous just on their own, it would be a really fun way to make felt.


So as an experiment, with as little manipulation as possible, I laid out a basic batt of carded wool (didn't want to use a MARVELLOUS batt in case it turned out a disaster) ...


... added some uncarded locks for colour and texture ...


... and tacked it together here and there with a felting needle.  I tried not to do too much tacking and manipulating, because I wanted to see how successful this method could be at its simplest.


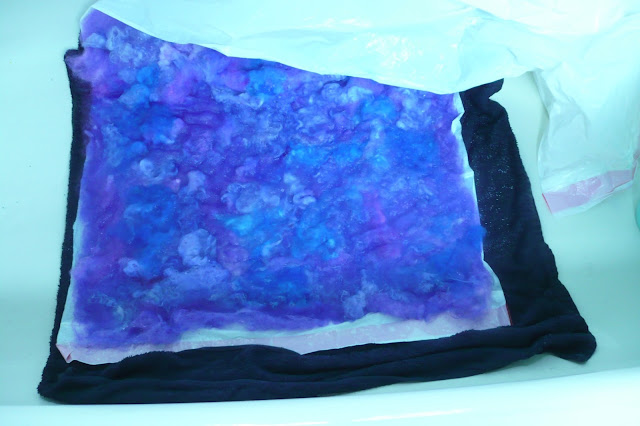
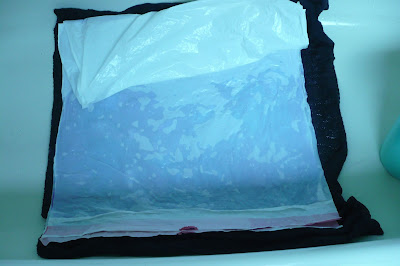
Here it is above, laid out on a cut-open garbage bag on a towel in my tub, after wetting it down with cold water.  Then (below) I folded the garbage bag down over the top.


Rolled it up around a towel


And tied it shut with butcher cord. 


After it was in the dryer (no heat) for 20 minutes or so, I could tell from the edges sticking out that it had felted and was ready to come out.


When I took the piece out, I held it up to the light to see how evenly (or unevenly) it had felted.  I could see that where I had put the ties, the felt was much thinner.


So I decided to do some fulling by hand to tighten the fibres a bit.  I dunked the piece in warm water and threw the piece down onto my felting tray, which is actually a textured boot tray, about 50 times.  I kind of like doing this -- it's not hard work like hand rolling is.


It pulled the piece together, but there are still thin places where the ties were, as well as some other thin places.  I think the other thin places are because I just unrolled the wool batt instead of layering on tufts of wool at right angles, as usually done in wetfelting.  Still a lovely piece of felt.


Here it is dried and ironed


And then embellished by needle-felting on some handspun yarn.  The large spiral is a Viking sun motif, and in the top right-hand corner there is the cross of St. John again, symbolizing happiness.


I like the effect of the multicoloured yarns against the textured background.  I messed up the cross, though, as you can see, one of my over-and-unders should have been an under-and-over...


... but that's all right, especially with the lovely textures of the handspun boucle, which I'm kind of fascinated with spinning right now.


I sewed a simple pocket on the back to hold a hanging rod.


Now I wanted to try to make a piece of dryer felt with no thin spots from string, and no thin spots from the quick and dirty method of just unrolling a batt and felting it as is.


I'd been thinking about making a two-piece hanging for my kitchen wall to feature one of my favourite quotes from M.F.K. Fisher: 
"I still think that one of the pleasantest of all emotions is to know that I, I with my brain and my hands, have nourished my beloved few, that I have concocted a stew or a story, a rarity or a plain dish, to sustain them truly against the hungers of the world.”

So I began with two batts of light turquoise Ile de France wool:


... added at right angles other turquoise-blue rovings and cardings ...


... and finished with some uncarded dyed fleece, tacking it all together with a felting needle.


This time when I rolled it up for felting, I put the roll in a control knee-high stocking and tied it shut.  


It worked perfectly!  No thin spots from ties or roving holes, and the stocking was tight enough that the fibre didn't slide around inside the roll, which I had been afraid of.  

The yarn I used for the text is some leftover handspun I'd made to knit my daughter a hat last winter.  The yarn on the border is Navajo-plied, and because it has such a round three-ply structure, it kept its roundness even after needle felting, which I like.  

I wish I could get these pics to sit side by side in this blog as they will on my kitchen wall, but they just don't want to, so it makes it tricky to read the quote  ...


My kitchen is painted a deep purple, so I'm looking forward to seeing these colours up on the wall.

Here's my St. John's cross again, this time done correctly and laced in a circle, which is also a motif I've found in books on Viking work.


Now on to my next project ... I'm thinking either a coat or a patchwork felt blanket ...


28 Jul 2013

Framing Tapestries or Lucky to have a Folk Artist Sister

I do love weaving tapestries, although it's awhile since I've indulged in that particular pleasure.  I wanted to share a great framing idea for small pieces -- anything lightweight enough not to sag between the hangers -- as well as my "usual" method for larger hangings.

I'd been experimenting with incorporating only certain warp threads into the weft, and letting others float above the weaving to add colour and texture to the image.


Fish tapestry, 16.5 cm x 11.5 cm (6 1/2" x  4 1/2")
Every second warp thread is left loose to float above.  I used a piece of paper to separate
the warp threads, flipped the loom over and wove the background from the back.
Then I flipped the loom over again to weave the fish into the floating warp threads,
and with a bundle of metallic threads did some free-form weaving to gather
the loose warp threads and give it a wavy, watery look.  The little purple guys were too small 

to hold their shape.  If you get far enough away and squint, they look fish-ish -- now I think of them 
as floating blurbles and have made peace with them.


Dragon tapestry, 18 cm x 10 cm (7" x 4")
I alternated green boucle and blue warp threads, weaving the blue into the bottom half
of the tapestry and letting the green float, and vice versa for the top half, using paper to keep
the threads separate, as for the fish.  The border edges weave in all the warp threads.
The tree is woven into the floating warp threads, and the dragon is embroidered
into the whole piece.


Here's another look at my fishie and dragon:


The dragon is the avatar I use for my Etsy shop

But how to hang these little guys?  I didn't want a permanent frame, because life is too rife with unforeseen circumstances to gamble so flagrantly, so no gluing or anything like that.  They're only small and lightweight, and I didn't want them to disappear on the wall by hanging them the usual way. 

And what's the usual way? you may ask.  Simple but effective: sew the fuzzy side of a length of velcro across the top of your tapestry.  Staple the sharp toothy side onto a length of narrow wood.


Sewing the velcro onto the tapestry can be hard on your fingers - it's tough to make
the needle go through that heavy velcro material.  However, I do not suggest
using stick-on velcro as an alternative.  The glue just isn't strong enough,
unless you have a very light-weight tapestry. And even so, I don't think it lasts long enough.

I guess you could machine-sew it onto the backing fabric before you sew it onto the
tapestry, but you'd have to be pretty exact in your measurements, as well as have the forethought
to do that bit first, which thus far in my life I guess I haven't...


Screw hanging loops into the top edge of the wood, and hey, presto! A perfectly hung tapestry - or at least a tapestry ready to be perfectly hung.


If the hanger is exactly as wide as your tapestry, there won't be any sag

I learned to do this from my tapestry instructor, many, many a year ago now, given away by the year I have stitched onto the back.  And the example I'm showing you is my first ever tapestry, woven in that very class.  Here it is from the front:


Troll in the Moonlight - my first weaving endeavour 46 cm x 43 cm (18" x 17")
I was inspired by Faroese folktales in choosing my subject.


I loved making this; it totally turned me onto weaving. Here he is close up, gazing pensively at the rising moon ...


The entire piece is woven, except I top-stitched on the black outline of the troll.
We learned yarn dyeing in that class as well, and I wove the sky out of yarns we dyed ourselves.


But back to the issue at hand.  My dragon and fish tapestries are much smaller than my troll, and I wanted an actual frame to help them stand out when they were hung.  This would save my fingertips from sewing on velcro, but still, what to do?  

Luckily, I happened to mention this quandary to my sister Kathi, who is a folk artist (Pufferbellies) and good with wood.  She made two great frames that are perfect - although admittedly you have to have some woodworking tools to make them just the way she did.


Each frame measures 29 cm x 24.5 cm (11 1/2" x 9 1/2"),
the centre area where the tapestry is mounted is recessed about 1/2 cm (1/4").

I love the way she painted the frames with layers of colours,
and the contrasting recessed centre that shows up the piece

They're two separate pieces of wood, the 1.5 cm-thick outer frame, and a thin piece of plywood mounted in the centre like a photograph in a frame.  


Aha, a secret glimpse of my high-tech homemade cardboard lightbox...

The tapestries are actually tied onto the recessed centre piece of plywood.  This is why I don't think it would work with heavier tapestries, because you would risk it sagging between the ties, or even being too heavy for the plywood to hold, depending on the size of the piece.


She drilled holes in the plywood to tie on the tapestries, which I did with strong upholstery thread.

Here they are from the back:


The plywood is held in place using those metal tabs used in photo frames.
With no woodworking skills or no access to tools, however, you could do something
simpler, just using the thin painted plywood and tying your piece onto the centre,
and then creating your own outer frame (out of felt, or woven pieces, or paper, or
more painted plywood) and gluing it onto the plywood around the piece.
Something quick and dirty would be to just buy a photo frame, punch holes 

in the cardboard backer, and sew the tapestry onto that.  You've lost
the handmade aspect of the frame, but sometimes you do what you have to, right?

Painting the back of her work is just one of those touches Kathi likes to add, and which I love.
The knot is just a reef knot so it's easy to untie if I ever need to.
And just for fun, here are some other tapestries I made a few years ago.  

This was my first experiment with floating warps, where I incorporated a frame into the picture - taken pre-lightbox, unfortunately, so the colours are all bleached and the picture quality is kind of lousy.  I gave the tapestry away so I can't re-photograph it...

The fish was woven with sari-silk yarn.
As I recollect, the piece measures about 25 cm x 25 cm (10" x 10")

And a couple other weaving experiments, also photographed sans lightbox some time ago ...


Pilot whales frolicking around the Faroe Islands - this was 40 cm x 40 cm (14" x 14")
Again, playing with incorporating the frame into the piece.

Fog creeping to a standing stone - the ground is sari-silk yarn, 40 cm x 15 cm (14" x 6")


16 May 2013

Joys of Accidental Felting OR No Such Thing as a Ruined Fleece

Washing raw fleece isn't the most challenging aspect of spinning, but doing it right isn't always easy and in my case it took a fair bit of learning from a lot of sources.  (Thank you, all you fibre artists out there, for sharing your expertise, especially those who give free advice.) Now that I've washed many fleeces, I can safely say that while I'm better at it than I used to be, I still have a ways to go.  So many types of fleece, each with its own personality.  It's actually a process I really enjoy.  But that's another topic for another day.

Today the topic is a sad event in my fleece-washing history.  Luckily, the world being what it is, sometimes these little sadnesses that seem so heartbreaking in the moment can become happy accidents when seen in the right light.

One of the first whole raw fleeces I bought was from a beautiful Romney ewe from Aspen Grove Farm in Nova Scotia.  It was early in my spinning days.  I had made the natural progression of many spinners from buying dyed wool top to dyeing the top myself, and then on to processing wool from raw fleece.  Because while spinning commercial top offers the charm of ease and speed and a certain quality of texture unrecreatable at home, there's nothing like rolling your own, as they say.

Anyway, blah blah through the early stages of this raw fleece experiment and fast forward to getting home from Nova Scotia with my beautiful Romney fleece.  It was big.  I washed the whole thing at once and through the magic and mystery of the alchemy of wool, hot water, and soap, managed to pretty much felt the whole darn thing despite feeling sure I hadn't done anything wrong.  Bits here and there were okay for spinning, but most of it I couldn't work with.  Lesson learned, right.  I packed it away at the back of my workroom and tried not to think about it.  Onwards and upwards.

But its presence was impossible to ignore because my workroom is TINY and PACKED FULL with yarn and fleece and dye and a sewing machine and craft books and fabric and two looms and a spinning wheel and a drum carder and ... you know how it is.  So even packed away, it was never far and remained buzzing around in my mind, this lovely fleece just waiting there for the next stage of its life -- because it was still lustrous, curly, wonderfully long locks, they were just all stuck fast together at the cut ends.  I had to do something visible with it.  This fleece could not wind up as stuffing.  

Then one day an Etsy friend who was packing up to move sent me a box of felting roving in several colours.  Very kind.  And the blues and greens got me thinking of the ocean, deep waters and slowly grazing fish.  Now it so happens that -- coming from Nova Scotia (which is right on the ocean) and living in Ontario (which is a two-day drive away from Nova Scotia) -- the ocean  and subjects sea-related are on my mind much of the time.  I really miss living out there and I miss those things that you take for granted when the shore is only 20 minutes away.  So getting this shipment of roving with its water colours put in my head an idea for a big felting project of an underwater scene. Suddenly all that lovely Romney fleece calling out to me from its Rubbermaid prison was tangled seaweed waiting for a place to call home.


Jellyfish - total size 50" x 72"


I used every piece of bubble wrap I could find in the house for this, and found  a bamboo roll-up blind on sale just big enough to roll up the whole thing.  I did the wet felting on the floor of the laundry room, either kneeling on my gardening mat firming up the surface of the felt, or sitting on a chair, rolling the bundle with my feet.  When it was dry, I needle-felted the rest.


(top left)

I didn't spend much time planning the layout.  I began adding seaweed and just let myself go.  It was really, really fun.  I also got out all the bits of dyed fleece I had leftover from various yarns I've spun, and some bits that have come in fibre packs I've bought from Etsy, such as the Bitter Peacock and UpCycled Art.  


(top right)

I wanted the fleece to be what the piece was all about, so while I did add some fish -- because I love fish; I like the simplistic shape that suggests "fish" - they're not detailed in themselves except that they're made from pieces of handmade felt that I really like.


(bottom left)
I really like the 3-D effect of the curly Romney fleece as well.  I would go on to say that it's reminiscent of the floating, reaching fronds of seaweed in the Atlantic but it really isn't.  I would do a lot more snorkelling, otherwise.  In fact I find actual North Atlantic seaweed kind of scary and threatening and do my best to avoid it in the water.  Funny that I was inspired to felt an entire tapestry featuring it.  Maybe it's a sign that I've simply misunderstood it all these years and seaweed and I are heading for a future of mutual respect...

(bottom right)

Friendly jellyfish who wouldn't sting anybody
My favourite, though, is this guy.  He really became the focus of the piece, even though he's small relative to the overall size of the wallhanging.  The legs are some crazy alpaca boucle hand-dyed by the Fleece Artist that I had leftover from a scarf I wove years ago for my daughter.  I only had a bit of it left, but I couldn't part with it because the colours and texture are so lovely.  Again, as with the seaweed, I'm not a huge lover of jellyfish.  Not actual ones when they're swimming in the water with me, at least.  On TV documentaries they can be very beautiful.

I loved making this piece.  I was so happy to have all that lovely Romney fleece to dye whatever colours I felt like, and needle-felting it all together with wild abandon was very fulfilling.  I felt rich.

To hang it -- this is always the hard part for me, and I always forget just how hard until I find myself in the midst of trying to hang something again -- I first mounted the felt.  I made a backer with a piece of red upholstery fabric -- I'd been going for purple, actually, or bluish-purple -- something ocean-like -- but this red caught my eye and after much humming and hawing in the fabric store I went with it.  I like how it plays with the other colours in the tapestry.  I sewed a heavy cotton lining onto the back for strength, and invisibly sewed the felt directly onto this backer.  The top is folded over to make a long pocket for a hanging rod.  I used one of those metal wall brackets that are perforated with holes for hanging shelf brackets.  I cut and hemmed five openings along the pocket to expose holes in the rod, and voila -- after an endless afternoon of arguing with my husband about the best placement for the five hooks on the living room wall (these things can be hard on a relationship!) -- we got it hung and this baby's not coming down!