21 Oct 2013

Using Art Yarn - the Fate of my Little Ones

Something I love about spinning is imagining what might be happening to my yarn after I send it out into the world.  Most of the time I never find out, and am left to ponder its fate -- was it made into a beloved garment?  Put away with the best of intentions and then forgotten about?  Discarded immediately with an embarrassed shrug?  I can't help wondering!  

Every now and then someone will send me a picture to share what they've done, though, and I can't exaggerate what a thrill that is. 

A year or two ago I was contacted by Mark Sloniker, an artist on Etsy, with a request for some supercoil yarn.  I love to make supercoil, although it's time-consuming.  It involves spinning a long, thin single, then plying it with another single or "core thread" by wrapping it pretty much at 90 degrees so as to encase the other single (like a core) with a long coil of yarn.  I discussed this process more, with illustrations, previously in my blog.


Example of supercoil yarn: I love the look and feel of these!

Mark had a particular project in mind -- a tree stump -- and asked for specific colours.  After getting his approval on the dye job I did on the wool -


Merino commercial top hand-painted with acid dyes

As the fibres are drafted apart for spinning, the colours fade and blend


I spun the yarn -


This totalled about 56 yards of supercoil yarn


Not long ago I heard back from Mark, who not only finished his truly gorgeous tree stump - as you can see below - 


You can read about how Mark made this fabulous piece on his blog
but used it as part of a set for illustrations to a children's book he has written, called Search for the Sugar Puff Hollow, available in his Etsy shop. 


 A pic from Mark's blog about the book -
love the critters, and hey, there's my yarn in the background!

There are tons of behind-the-scene photos of the making of this beautiful book on Mark's blog HERE.

So a totally exciting story of some yarn that has gone on to make me proud! I'm humbled by his amazing creativity.

In the meantime, I keep spinning...


I always try to keep a few skeins of supercoil in my Etsy shop...


7 Sept 2013

Corespun Yarn with Ribbon Rose Inclusions

One thing I like about corespun yarn is how easy it is to include small items like beads or flowers.


Today it's about flowers.  How decadent, to have these little beauties interspersed throughout your work, whatever your fibre art of choice happens to be.  Being in the mood for reds lately, I combed out a selection of red fleeces into some lovely top.  


So what's the story on this selection of top?  This past summer when I was down home in Nova Scotia I bought a lovely Romney x Lincoln Longwool fleece at Aspen Grove Farm outside Bridgewater. Very lustrous and curly.  I dyed it mostly in different reds and one fuchsia because, hey, how can you not dye something fuchsia?  It took the dye beautifully.  This skein includes all those reds and pinks from the Romney/Lincoln fleece, plus a bit of Corriedale.  So it won't be a soft and fluffy yarn, but it will be lustrous and textured.


Because I didn't want to blend all those lovely reds together (although in these photos they seem to look more pink than red - you'll just have to trust me on this) but wanted each colour to speak its own voice in some random fashion, I prepared my top for spinning by laying out a strip of each colour on my lap ... 


... and drafting it out into a long cord (strip? I'm not so great at the proper vocabulary, here) of top.  So there is some colour intermingling, and some striping of one colour after another.  

Next for the flowers to include in the yarn:


I buy these ribbon roses from Laurl on Etsy.  This small size fits easily through the orifice on my wheel and doesn't get caught in the hooks.  There are larger ribbon flowers available that can be fed through the orifice with lots of care and patience, and although I have at times in my life had sufficient emotional wherewithal to calmly, gently, and successfully ease large ribbon flowers through my wheel workings, this is not something I reliably have in vast quantities, nor do I want to spend it all on my yarn in case that means I'm going to have a complete meltdown later in the day when I burn supper or break my favourite mug.  We live our lives and do what works best, right?  For me, sticking to smaller, more easily dealt-with flowers is the road I have chosen.  My advice is, before starting a project like this, make sure whatever it is you're spinning into your yarn will fit through your orifice and hooks, and consider how willing you're going to be to nurse the yarn along if it's a close fit.


I spun a small sample skein just to see how the colours would play out with the whole hand-drafting the top together method, and also to help me pick what colour flowers I wanted to use.  I think any of these would be nice, but I wanted the flowers to stand out.


Here's my practice skein still on the wheel -- you can see drafting the top as I did worked just fine, and I have random sections of different reds all throughout my yarn ...


... and here are my rose colour choices.  Sadly, the light pink one didn't focus very well, but I think it will stand out best against the reds, and that's what I'm going with.


First step is to thread the roses onto a spool of strong nylon beading thread.  This thread will be strung alongside my strong cotton core in the yarn.


The roses are sewn together across the back, making an ideal spot to run the needle to thread the roses onto the nylon, i.e., between the "leaf" ribbon and the "blossom" ribbon, within the bounds of that stitch.  I took some fabulous shots of the pink flowers being strung onto the nylon.  What in the world happened to them?  I have no idea.  But they've completely disappeared so you're just going to have to use your imagination here.


Now I'm set up for spinning.  Next to me I have a bin with my cotton core (embroidery cotton #10), and another bin with my nylon beading thread.  My comments on this set-up are as follows:

1. You don't need to use two cores.  You can thread all the flowers onto the cotton core.  However, it's a thicker thread and not as slippery, so you have to take more care putting your roses on and sliding them along as you're spinning -- which is okay, I've done it successfully and it's not a terrible drag. It's just easier and smoother with nylon.

2. I thread all the flowers on at once, sliding them a few metres down the thread.  Then I spread out the first five or so flowers where I want them along the nylon.  They tend to stay where I want them, so it's a convenient way to keep track of how far apart they are in the yarn.  I've tried spacing all the flowers out at once, and wound up with a gigantic tangle of nylon in the bin, so just doing a half-dozen or so at a time seems to be the answer for me.  You can see in the photo above, one pink rose hanging on the nylon thread, making its way up towards the wheel to be spun into the yarn.

3. One of the best online tutorials for corespinning yarn that I have seen is by Esther Rodgers of Jazz Turtle.  This is a good video for showing how to start your corespun yarn and introduce the core threads to get going.

4.  Why do I use these ugly plastic bins?  I know.  They're not at all handmade or attractive or anything inspiring creativity.  Here's the thing.  Handmade baskets are tremendously beautiful.  I love them.  But they catch and pick at my materials as I'm spinning, which is not only frustrating but can cause damage.  There are lovely felted baskets which wouldn't do that, but the reality of my life is that I use almost exclusively handprocessed fleece in my yarns.  That means I'm doing a lot of combing and carding, and no matter how much vacuuming and sweeping I do in my craft room, there's always a film of VM (dried crumbs of plant matter) on my floor.  I don't want to even think about what that would do to a lovely felted basket.  Plus I need bins for tons of reasons, including holding uncombed (VM-laden) fleece.  And the ugly plastic ones wipe out easily, are stackable, and sturdy enough that they can hold that huge cone of embroidery cotton in the same place as it's rolling around.  So I forego the aesthetic qualities of more attractive baskets as worktools in this particular situation.


So here we are, corespinning along.  I've just lifted my thumb back to show how I keep the core threads stable in my hand by running them under my ring finger.  My pointer finger smooths the wool around the core as I'm spinning along.


When I get within a few inches of a rose, I stop spinning and slide the flower up the thread to meet the end point of my yarn.  Here I'm holding the two core threads (cotton and nylon) separate, just for the sake of the picture.  When I'm actually spinning, I hold them together.


Fit the rose right up against the wool, treadle once ... 


... which wraps the wool around the back of the flower ... 


... and spin on down the core.  Keep an eye on the rose as you continue to spin.  Hopefully it should feed easily through your orifice and onto your wheel, but depending on your wheel it may need a hand -- you'll know right away, because the yarn will stop feeding onto the bobbin.  Just stop spinning, ease the flower through, handwinding it onto the bobbin if necessary, and continue on your way.


Here's a photo of the final yarn, which, taken in my homemade lightbox, shows something much more RED than the pinkish colours above.  It really is these reds, and not those pinks, which teaches us all something about how unreliable cameras are for showing us what anything actually looks like.  Now that's deep.


See this yarn in my ETSY SHOP

Here are some other ribbon rose yarns I've spun - this first one corespun with uncarded locks dyed green, so there's lots of texture and curl.


Available in my ETSY SHOP


In my ETSY SHOP

 In my ETSY SHOP


This was the last skein I spun using larger flowers.  They do look marvellous, and maybe someday when I get my dream larger-orificed Country Spinner, I'll go back to including these flagrant beauties...

9 Aug 2013

More Dryer Felting and Felt Tapestries

Detail from my ultimate project for today's entry


I recently made a small felt wall hanging for one of my sisters on her 50th birthday.  It's had me thinking about felting and making hangings that feature words and symbols instead of pictures.


She's lived a lot since this photo was taken, but hasn't changed so much... I think pictures are forever.
Finished piece measured about 18" x 12"


I love embellishing the felt by needle-felting in handspun yarn and roving.  I attached the photograph on by punching holes around the edges and then needle-felting
 a continuous length of handspun yarn in the holes and into the felt around the edges to look like big stitches.


The symbols I copied out of books of Viking wooden carvings.  I like not only that these are old motifs, but I love the flow of intertwining knots.  Someday I'll do a huge piece with knots all around the border.


I particularly love this symbol, which is 
St. John's cross and represents
happiness (well I guess it wasn't 
St. John's cross to the Vikings! But 
they used it in their art work all the same.)


So after my recent experiment felting in the dryer with Pellon I got to thinking. Since the Pellon disappeared immediately once it got wet, why bother with the Pellon at all?  Why not just unroll a batt, wet it, and throw it in the dryer?  Batts can be so marvellous just on their own, it would be a really fun way to make felt.


So as an experiment, with as little manipulation as possible, I laid out a basic batt of carded wool (didn't want to use a MARVELLOUS batt in case it turned out a disaster) ...


... added some uncarded locks for colour and texture ...


... and tacked it together here and there with a felting needle.  I tried not to do too much tacking and manipulating, because I wanted to see how successful this method could be at its simplest.


Here it is above, laid out on a cut-open garbage bag on a towel in my tub, after wetting it down with cold water.  Then (below) I folded the garbage bag down over the top.


Rolled it up around a towel


And tied it shut with butcher cord. 


After it was in the dryer (no heat) for 20 minutes or so, I could tell from the edges sticking out that it had felted and was ready to come out.


When I took the piece out, I held it up to the light to see how evenly (or unevenly) it had felted.  I could see that where I had put the ties, the felt was much thinner.


So I decided to do some fulling by hand to tighten the fibres a bit.  I dunked the piece in warm water and threw the piece down onto my felting tray, which is actually a textured boot tray, about 50 times.  I kind of like doing this -- it's not hard work like hand rolling is.


It pulled the piece together, but there are still thin places where the ties were, as well as some other thin places.  I think the other thin places are because I just unrolled the wool batt instead of layering on tufts of wool at right angles, as usually done in wetfelting.  Still a lovely piece of felt.


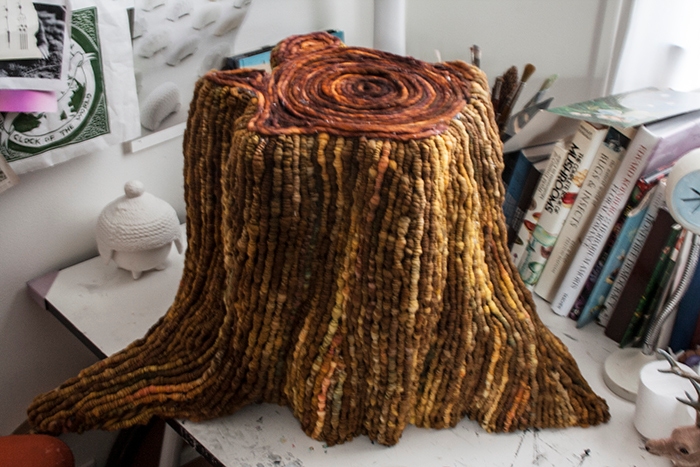
Here it is dried and ironed


And then embellished by needle-felting on some handspun yarn.  The large spiral is a Viking sun motif, and in the top right-hand corner there is the cross of St. John again, symbolizing happiness.


I like the effect of the multicoloured yarns against the textured background.  I messed up the cross, though, as you can see, one of my over-and-unders should have been an under-and-over...


... but that's all right, especially with the lovely textures of the handspun boucle, which I'm kind of fascinated with spinning right now.


I sewed a simple pocket on the back to hold a hanging rod.


Now I wanted to try to make a piece of dryer felt with no thin spots from string, and no thin spots from the quick and dirty method of just unrolling a batt and felting it as is.


I'd been thinking about making a two-piece hanging for my kitchen wall to feature one of my favourite quotes from M.F.K. Fisher: 
"I still think that one of the pleasantest of all emotions is to know that I, I with my brain and my hands, have nourished my beloved few, that I have concocted a stew or a story, a rarity or a plain dish, to sustain them truly against the hungers of the world.”

So I began with two batts of light turquoise Ile de France wool:


... added at right angles other turquoise-blue rovings and cardings ...


... and finished with some uncarded dyed fleece, tacking it all together with a felting needle.


This time when I rolled it up for felting, I put the roll in a control knee-high stocking and tied it shut.  


It worked perfectly!  No thin spots from ties or roving holes, and the stocking was tight enough that the fibre didn't slide around inside the roll, which I had been afraid of.  

The yarn I used for the text is some leftover handspun I'd made to knit my daughter a hat last winter.  The yarn on the border is Navajo-plied, and because it has such a round three-ply structure, it kept its roundness even after needle felting, which I like.  

I wish I could get these pics to sit side by side in this blog as they will on my kitchen wall, but they just don't want to, so it makes it tricky to read the quote  ...


My kitchen is painted a deep purple, so I'm looking forward to seeing these colours up on the wall.

Here's my St. John's cross again, this time done correctly and laced in a circle, which is also a motif I've found in books on Viking work.


Now on to my next project ... I'm thinking either a coat or a patchwork felt blanket ...